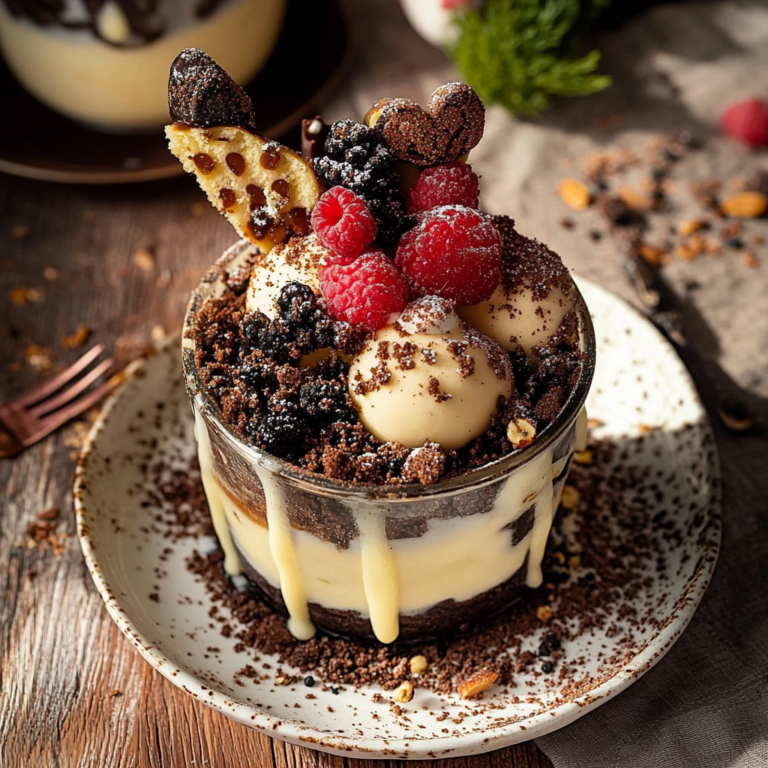
Irresistible Wild Forest Classic Dirt Pudding Cake Recipe
If you’re looking for a dessert that captures the essence of childhood joy and brings smiles to everyone at the table, look no further than Wild Forest Classic Dirt Pudding Cake. This delightful treat is not just a dessert; it’s an experience filled with layers of creamy pudding, rich chocolate, and crunchy cookie “dirt” that will transport you back to carefree days in the forest. Perfect for birthday parties, picnics, or even a cozy family night at home, this cake is sure to be a hit.
What I love most about Wild Forest Classic Dirt Pudding Cake is its versatility. It can be dressed up for special occasions or simply enjoyed as a comforting dessert after dinner. The fun presentation and delicious flavors make it a favorite among kids and adults alike!
Why You’ll Love This Recipe
– Easy to make: With simple ingredients and straightforward steps, this recipe is perfect for bakers of all skill levels.
– No baking required: Say goodbye to complicated oven instructions; this cake comes together without turning on the heat.
– Fun assembly: Layering the pudding and cookie mixture is not only easy but also allows for creative expression.
– Crowd-pleaser: Whether you’re serving it at a birthday party or a family gathering, everyone will love digging into this delightful treat.
Ingredients You’ll Need
Gathering your ingredients is half the fun! Here’s what you’ll need to whip up this fantastic Wild Forest Classic Dirt Pudding Cake.
For the Pudding Mixture
– 2 cups of non-dairy milk
– 1 package of instant chocolate pudding mix
– 1 cup of dairy-free whipped topping
For the Cookie Layer
– 12 chocolate sandwich cookies
– 1/4 cup of melted non-dairy butter
For Garnish
– Gummy worms (or any other fun candies)
– Additional crushed cookies (for topping)
Variations
One of the best parts about making Wild Forest Classic Dirt Pudding Cake is how flexible it can be! Feel free to get creative with these fun variations:
– Swap the cookies: Use vanilla sandwich cookies instead of chocolate for a different flavor profile.
– Add fruit: Layer in some crushed strawberries or blueberries between the pudding and cookie layers for an extra burst of sweetness.
– Change up the toppings: Use different candies like gummy bears or chocolate rocks for a unique twist.
– Try different puddings: Experiment with vanilla or butterscotch pudding to switch things up.
How to Make Wild Forest Classic Dirt Pudding Cake
Step 1: Prepare the Pudding Mixture
Start by whisking together the non-dairy milk and instant chocolate pudding mix in a mixing bowl. This step is crucial as it will create the creamy base of your cake. Allow it to set for about five minutes until thickened, then gently fold in the dairy-free whipped topping. By incorporating air into this mixture, you’ll add lightness and fluffiness that enhances the final product.
Step 2: Crush the Cookies
Next, place your chocolate sandwich cookies into a zip-top bag and crush them using a rolling pin or your hands until they resemble coarse crumbs. This crunchy layer mimics dirt and adds texture to your cake. Remember, having some larger chunks adds visual interest!
Step 3: Combine Cookie Crumbs with Non-Dairy Butter
In a bowl, mix together your crushed cookies with melted non-dairy butter until well combined. This helps bind the crumbs together and creates that signature “dirt” layer that everyone loves. It’s essential for achieving that perfect crumbly texture.
Step 4: Layer Your Cake
Now comes the fun part! In a clear glass bowl or individual cups, start layering your ingredients. Begin with half of your pudding mixture at the bottom, followed by half of your cookie crumb mixture. Repeat these layers until you reach the top. This method not only looks beautiful but allows every bite to have balanced flavors.
Step 5: Add Toppings and Chill
Finish off by sprinkling additional crushed cookies on top and garnishing with gummy worms for that playful touch. Cover your dessert with plastic wrap and refrigerate for at least two hours before serving. Chilling allows all those lovely flavors to meld together while giving everything time to set properly—trust me; it’s worth the wait!
With these steps completed, you’ll be ready to dive into an unforgettable Wild Forest Classic Dirt Pudding Cake experience! Enjoy each delicious bite as you reminisce about simpler times spent outdoors surrounded by nature’s beauty.
Pro Tips for Making Wild Forest Classic Dirt Pudding Cake
Creating the perfect Wild Forest Classic Dirt Pudding Cake can be a delightful experience, filled with fun and creativity. Here are some pro tips to ensure your cake turns out amazing and impresses everyone at the gathering.
– Use fresh ingredients: Fresh whipped cream and high-quality chocolate pudding will enhance the flavor of your cake, making it taste more indulgent and satisfying.
– Chill the layers: Allow each layer of pudding and whipped cream to chill in the refrigerator for at least 30 minutes before layering. This helps the textures meld beautifully and ensures a firm structure.
– Experiment with flavors: Don’t hesitate to add a touch of vanilla extract or a sprinkle of cinnamon to the pudding mix for an unexpected twist that can elevate the overall flavor profile.
– Choose your dirt wisely: Crushed cookies are traditional, but feel free to switch things up with crushed gluten-free cookies or even granola if you prefer a healthier crunch.
– Go wild with toppings: Add seasonal fruits like berries or banana slices on top for added freshness and a pop of color that makes your cake visually appealing.
How to Serve Wild Forest Classic Dirt Pudding Cake
Serving this dessert is as enjoyable as making it! With its whimsical appearance, you can present it in various ways that will excite your guests.
Individual Servings
Consider serving individual portions in small cups or jars for a charming presentation. This way, each guest gets their own “dirt” cup, making it easier to enjoy.
Family Style
For a more communal approach, place the entire cake in the center of the table and let everyone dig in. This creates a fun atmosphere where people can serve themselves and share stories over dessert.
Themed Decor
If you’re hosting a party, consider theming the decorations around nature. Using green napkins or leaf-shaped plates can enhance the forest feel and make your dessert stand out even more.
Garnishes
– Fresh mint leaves: A few sprigs add a pop of color and freshness on top.
– Edible flowers: These can make your dessert look elegant and inviting.
– Chocolate shavings: A light sprinkle can bring extra richness visually and taste-wise.
Side Dishes
– Fresh fruit salad: A refreshing contrast that complements the rich flavors of the cake.
– Vanilla ice cream: A creamy side that pairs perfectly with chocolate desserts.
– Whipped coconut cream: For those who prefer non-dairy options, this adds lightness.
– Coffee or herbal tea: Serves as a nice beverage option to cleanse the palate between bites.
Make Ahead and Storage
Preparing ahead of time can save you stress on special occasions. Here’s how to store any leftovers effectively while keeping your Wild Forest Classic Dirt Pudding Cake fresh and delicious.
Storing Leftovers
– Cover tightly: Use plastic wrap or an airtight container to keep air out, preventing drying out.
– Refrigerate promptly: Store leftovers in the fridge within two hours after serving for optimal freshness.
Freezing
– Freeze before adding toppings: If you want to freeze portions, do so before adding crushed cookies or garnishes; they don’t freeze well.
– Use freezer-safe containers: Ensure you use containers made for freezing to avoid freezer burn.
Reheating
– Thaw gently: If frozen, transfer it to the fridge overnight before serving again; never microwave directly as it alters texture.
– Serve cold or slightly chilled: This dessert is best enjoyed cold; just refrigerate until ready to serve!
FAQs
Can I use dairy-free alternatives?
Yes! You can substitute dairy products with almond milk or coconut cream without sacrificing flavor.
How long can I store leftovers?
Leftovers should ideally be consumed within 3 days when stored properly in an airtight container in the refrigerator.
Can I make this cake gluten-free?
Absolutely! Simply choose gluten-free cookies for crushing as “dirt,” ensuring all other ingredients are also gluten-free.
Is this recipe suitable for kids?
Yes! This dessert is not only safe but also fun for kids to help assemble, making it perfect for family gatherings or parties.
Final Thoughts
Wild Forest Classic Dirt Pudding Cake is not just a treat; it’s an adventure in flavor and presentation. I hope these tips inspire you to create your own version at home. Gather your loved ones, get those layers going, and enjoy every delightful bite together! Happy baking!